

Discover the artistry of breathing life into your landscapes with vivid greens and enchanting details through masterful painting techniques.
There’s something undeniably captivating about a lush, green landscape brought to life in acrylic painting. It isn’t just about blending colors or mimicking natural scenery; it’s an invitation to create a world filled with wonder, serenity, and an undeniable sense of magic. So, how can you transport viewers into this verdant paradise? Let’s dive into the art of landscape painting, with easy-to-follow painting tips and techniques that will turn the ordinary into the extraordinary.
Step into the Magic: The Art of Green Landscapes
Master the magic of greens with depth, light, and bold imagination in your landscape art.
Green landscapes are more than fields and forests. They are about embracing the textures, shadows, and vibrant life that Mother Nature offers. To create your magical green landscape, it’s essential to focus on:
- Layering light and shadow: Start with soft undertones to establish depth before building bold, bright highlights. For this step, high-quality brushes such as the ones found here can make a world of difference.
- Capturing greenery diversity: Grass isn’t all one color! Mix lighter lime greens and darker emeralds directly on your palette to mimic nature’s palette. Experiment and practice on smaller panels before finalizing your masterpiece.
- Blending skies and earth seamlessly: The sky–whether bright or stormy–frames the ground and should delicately transition into the green landscape. Use wide, soft brushes (explore options here) to ensure smooth blending across your canvas.
The true magic is leaving space for the imagination. Add whimsical elements—a babbling brook, faint sunlight streaming through treetops, or even playful wildlife—to infuse your painting with life and charm.
Painting Techniques to Elevate Your Work
Artists often forget how much painting techniques matter in elevating their work from good to breathtaking. Here are tips to bring boldness and dynamics into your landscape painting:
- Use acrylics smartly: Acrylics allow for fast drying but offer an advantage in layering. Glazing with diluted washes of color adds depth.
- Experiment with texture: Utilize palette knives for bark textures or sponges for natural grass effects on your landscape art. Want to try these tools? Find professional-grade supplies here.
- Tap into highlights: By using a round-tip brush to dab bright white or extremely light green onto tree leaves and grass, you mimic sunlight catching uneven surfaces in nature.
Turn your blank canvas into something that feels alive, intricate, and radiant.
Key Tips to Keep it Magical
To truly immerse yourself in landscape painting, ensure the following:
- Plan your composition: A good layout keeps the eye moving through interlocking elements, such as meandering trails, winding rivers, or tiny details like florals. Get step-by-step painting instructions here.
- Balance tones strategically: Pay attention to where your lightest greens and darkest shadows fall. Begin with a mid-tone green and build up to create a vibrant gradient.
- Add dimension through layering: Powerful acrylic painting techniques rely on creating layers that showcase variety.
Why Mastering Green Landscapes Matters in Landscape Art
Magical green landscapes aren’t bound to one interpretation. They symbolize endless possibility—a connection to the wild yet peaceful energy that soothes the soul. Learning the art of creating these masterpieces will push your creativity to new limits while enhancing the execution and use of painting techniques.
Explore more landscape art or find your tools and inspiration here.
Start Your Next Adventure!
Feeling inspired? Gather your supplies and let your inner artist take over. Imagine lush greenery unfolding on your canvas, leading viewers down enchanted paths. Whether you prefer to follow detailed tutorials or let your creativity guide you, every brushstroke brings you closer to unlocking the beauty of nature.
Find everything you need to master this craft, from specialty painting supplies to coaching resources, at Urart Studio.
Keywords:
green landscape, acrylic painting, painting techniques, landscape art, landscape painting, painting tips, magical green scenery, artistic acrylic textures
Hashtags:
#AcrylicLandscape #ArtisticInspiration #MagicalGreen #ArtTips #LandscapePainting #PaintingTechniques #CreativeArtistry #NatureArt
RECOMMENDED ART SUPPLY
Medium: Acrylics
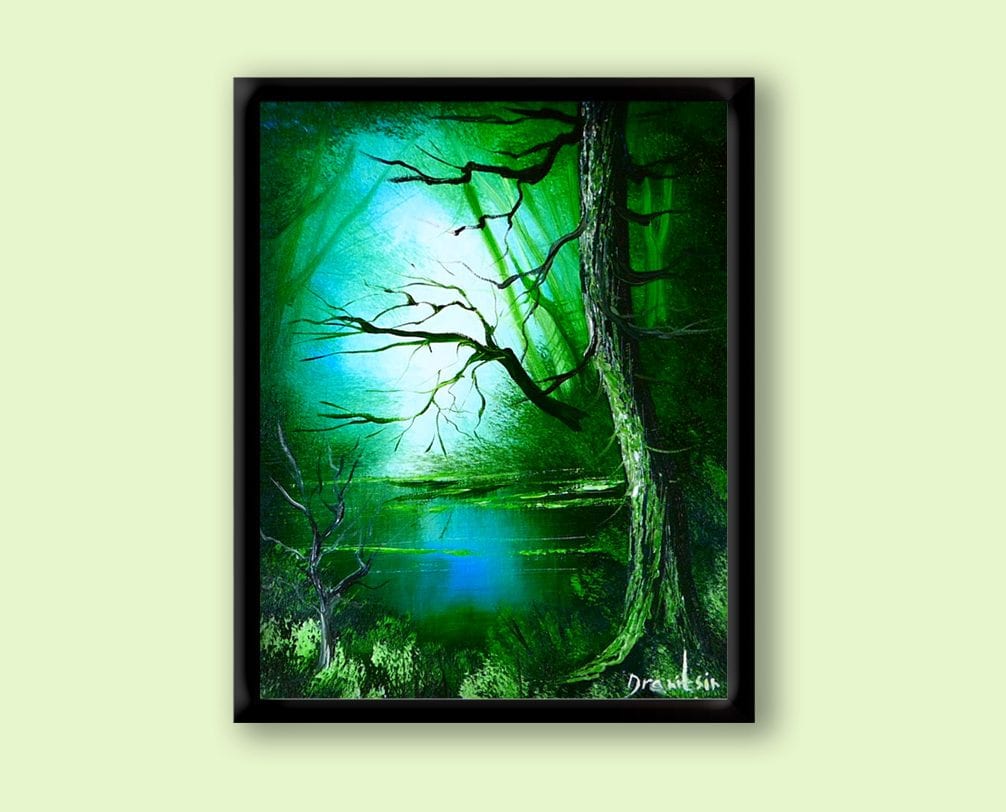
Title & Theme: “The Sound of Silence” – A deep green landscape painting
TOOLS & MATERIALS
Brushes:
- 1″ Flat brush
- Oval brush
- Palette knife
- Liner brush
- #4 Angled brush
Other Tools:
- Brush washing bucket
- Clean and dry towel (for drying brushes)
Colors:
- Prussian Green
- Cobalt Blue
- Titanium White
- Payne’s Grey
Canvas:
- 11×14 inches, positioned vertically
Initial Canvas Preparation
- Place your canvas vertically.
- Lightly spray water over the surface and use a clean cloth to wipe off any excess.
- A slightly damp canvas will allow for smoother paint application and extended working time before the acrylic paint dries.
HOW TO PAINT ‘THE SOUND OF SILENCE’
Step 1: Preparing Your Light Source
- Identify the location of your light source.
- Using the 1″ flat brush, apply a small amount of Cobalt Blue around the light source area, creating a gentle glow.
Step 2: Adding Background Colors (Stage 1)
- Gradually add Prussian Green around the blue area, ensuring the colors gently transition.
- Darker colors placed around lighter ones enhance depth in the painting.
Step 3: Adding Background Colors (Stage 2)
- Surround the Prussian Green with Payne’s Grey, allowing the green and grey to overlap slightly (but without fully covering the green).
Step 4: Blending the Background
- Take the oval brush and begin blending the background colors.
- Always start blending from the lightest area toward darker sections in soft, circular motions.
- Wipe your brush clean in the washing bucket, then dry it on a towel before continuing to keep blending neat.
Step 5: Dividing the Landscape into Two Sections
- Use darker tones of Prussian Green to blend and create a faint dividing line across the canvas. This will serve as the horizon between land and water. Ensure it remains slightly subtle and doesn’t overpower the lower portion of the canvas.
Step 6: Painting Water Reflection (Stage 1)
- With a 1” flat brush, create reflections by dragging paint vertically downward from the horizon line.
- Use a soft touch and light pressure, following up with horizontal brush strokes to form a mirror effect on the water.
- Clean your brush after every stroke to maintain clarity.
Step 7: Painting Distant Trees
- Use the #4 angled brush to create faint tree trunks on the horizon line.
- Blend darker shades into some trunks to create a sense of depth and variation.
Step 8: Adding Details to the Trees
- Switch to the liner brush for adding finer details like branches and leaves.
- Use darker colors for distant trees, and increase the level of detail for closer ones to enhance their realism.
Step 9: Water Reflection (Stage 2)
- Reflections of trees can be added in the water below them using blurred vertical strokes with the liner brush.
- Blend the reflection further with the flat blending brush, using light, horizontal strokes to soften them.
Step 10: Adding Water Lines
- Mix Prussian Green, Cobalt Blue, and Titanium White on your palette.
- Use the edge of the palette knife to pick up a thin line of paint. Gently carve out water lines on the surface by pressing the knife tip onto the canvas to indicate small ripples.
Step 11: Defining the Land and Grass
- Mix Prussian Green and Titanium White to create varying shades of green for grass.
- For the first layer, use the oval brush to dab this mix along the base of the canvas. Focus on creating a soft, textured grassy effect.
Step 12: Building the Foreground
- Gradually define the land area using darker greens and greys.
- This foreground layer will set the stage for the addition of trees and shrubs in the next steps.
Step 13: Painting the Big Tree
- Load the angled brush with Prussian Green, Payne’s Grey, or a mix of darker colors.
- Create a large tree trunk on the right side of the canvas using a steady motion.
Step 14: Adding Texture to the Big Tree
- Use the palette knife to apply streaks of a lighter green onto the tree trunk. This gives the illusion of rough bark, highlighting areas exposed to light.
- Alternate between lighter and darker shades to add depth and texture.
Step 15: Creating Branches
- Use the liner brush to construct twisting, detailed branches extending from the trunk.
- Keep your brush slightly wet to allow the paint to flow smoothly.
Step 16: Enhancing Grass in the Foreground
- Add a brighter layer of grass using lighter green shades on the oval brush.
- Focus on creating more detailed, swaying blades in the foreground to push the darker grass further into the background.
Step 17: Adding a Foreground Shrub or Bush
- Using Payne’s Grey and the liner brush, sketch the shape of a plant or bush in the lower corner. Highlight its top with lighter colors for added dimension.
Step 18: Final Touches
- Step back and assess the painting as a whole. Adjust highlights, shadows, or add small details to tie the landscape together.
Step 19: Sign Your Painting
- Use the liner brush and a lighter color that contrasts well with the background to sign your painting in the bottom right corner.
SUMMARY & TIPS
With these tools, steps, and techniques, you’ll create an evocative green landscape reminiscent of the serene quietness represented in “The Sound of Silence.”
- Experimentation is Key: Don’t be afraid to try new textures, colors, or features. Each painting will help you develop your skills.
- Patience is Essential: Every masterpiece takes time. Even if your artwork doesn’t turn out exactly as you envisioned, embrace the process of improvement.
- Seek Feedback: Share your work with friends or family and welcome constructive criticism with an open mind.
Most importantly, enjoy the creative process and have fun exploring your artistic potential.
Happy painting!