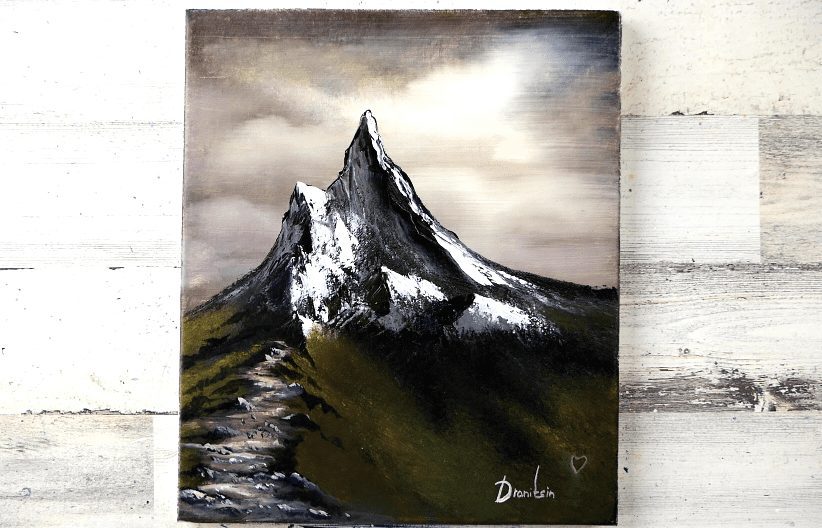
Embark on a creative journey as we guide you through building an awe-inspiring landscape painting of a serene mountain path. Whether you’re a novice painter or a skilled artist, this step-by-step tutorial will teach you essential acrylic painting techniques while bringing your imagination to life with breathtaking natural details.
Let’s get started!
Materials You’ll Need
(Make sure to grab all your tools from our art supply shop for the best experience!)
- Acrylic paints (Recommended colors: Titanium White, Ultramarine Blue, Burnt Umber, Yellow Ochre, Sap Green, Black, and Cadmium Red)
- Brushes in varying sizes, such as flat brushes, fan brushes, and detail round brushes. (Get our premium selection of artistic brushes here!)
- A sturdy canvas (we recommend an 8″x10″ or larger)
- Palette and palette knife
- A jar of water
- Rag or paper towels
Step 1: Prepare Your Canvas
Before diving into the brushstrokes, focus on prep work to set your stage. Use a clean, dry canvas, and apply a thin coat of Gesso if desired. This creates a smooth surface for your acrylic painting and ensures vibrant colors. Let it dry completely before moving to the next step.
Step 2: Sketch the Outline of Your Mountain Path
Lightly sketch out your scene with a pencil. Place the mountain path leading into the distance, surrounded by looming mountains, wild trees, and a beautiful sky.
👉 Pro Tip: Begin with rough shapes—don’t stress about the details yet. Remember, this is just a guideline for your layers of paint!
💡 Need guidance with initial sketches? Discover more painting tips on our blog!
Step 3: Starting with the Background – The Sky
Blend a smooth gradient for the sky using acrylic paints. Start by mixing Ultramarine Blue and White to create soft blues. Apply your paint in broad, horizontal strokes with a flat brush. Creating a beautiful sky is the foundation of all dynamic landscape art!
- Use lighter tones near the horizon and darker blues as you move upward for depth.
- Add soft, fluffy clouds with a damp round brush and dabs of white—blend lightly for a natural, airy look.
Step 4: Define the Mountains
With your background skies dry, shape your mountain peaks using a palette knife and acrylic painting techniques. Mix Burnt Umber, Black, and White to make different shades of gray. Apply a rough, jagged texture to mimic rocky surfaces.
- Add shadows and highlights to make your mountains pop! Use lighter tones on one side for sunlight and darker shades for shadowed areas.
- A palette knife works wonderfully to carve out realism in your landscape art.
Discover more step-by-step painting instructions for creating natural textures!
Step 5: Paint the Pathway
Bring the mountain path to life with warm, earthy tones. Use Yellow Ochre, Burnt Umber, and hints of white to create a realistic dirt texture. Start with lighter colors on the path’s edges and gradually darken toward the center for depth.
- Use a flat brush for wider, broader strokes and a round detail brush for adding smaller stones and gravel.
- Remember, paths should taper towards the center to create perspective and guide the viewer’s eyes.
Step 6: Add Lush Greenery
Next, it’s time to paint the surrounding trees, bushes, and shrubs to frame your mountain path. Use shades of Sap Green, Yellow Ochre, and highlights of white for natural foliage.
- Use a fan brush and dabbing strokes to mimic the texture of leaves on nearby trees.
- For distant greenery, use a dry brush technique to give the appearance of softer, hazier shapes.
Step 7: Layer in Details
As your acrylic painting comes together, focus now on adding intricate details to bring your landscape art to life:
- Add wildflowers or tiny patches of grass along the sides of your pathway using dabs of a small round brush. Explore Cadmium Red and Yellow for vibrant pops of color.
- Blend depth into the pathway edges by using fine brushes to create shadows from nearby shrubs and scattered rocks.
- Touch up areas on your mountains for enhanced light and shadow contrast.
Step 8: Final Touches & Finishing Up
Step back and evaluate your work. Look for areas that may need blending, adjusting highlights, or softening harsh lines. Once satisfied, seal your landscape painting with a clear acrylic varnish to protect it.
Congratulations! You’ve created a breathtaking Mountain Path acrylic painting—a timeless piece of natural artistry!
Helpful Resources for Your Next Masterpiece
To keep your painting journey exciting, explore these resources!
- Browse the best brushes for landscape painting.
- Learn insider step-by-step painting instructions.
- Master new painting tips and techniques.
Build a collection of original artwork—join our shop today!
Support your artistic journey with unique handmade original paintings or stock up on high-quality materials at our art supplies shop.
Keywords
Mountain path, acrylic painting techniques, step-by-step painting instructions, painting tips, landscape painting, original paintings, brushes for painting, acrylic art
Hashtags
#AcrylicPainting #MountainPathPainting #LandscapeArt #StepByStepPainting #PaintingTechniques #AcrylicArtTutorial #UrArtStudio #LandscapePaintingTips
* Become a Member – https://www.youtube.com/channel/UC3hCdJZXe9k52K6FIzUBLeA/join


Leave a Reply
You must be logged in to post a comment.