Subtitle:
Extend the Life of Your Precious Brushes With These Foolproof Tips!
When you’re deep in your artistic flow, whether it’s crafting stunning landscapes, acrylic masterpieces, or experimenting with cutting-edge painting techniques, taking care of your trusty pointed oval brushes is essential. Brushes are the artist’s tool of magic, and proper maintenance ensures they stay in peak condition to keep your painting experience effortless and creative. If you’ve just wrapped up a marathon acrylic painting session and you’re wondering how to care for your brush, you’re in the right place!
Below is your step-by-step guide to washing your pointed oval brush, paired with some insider tips to make it sparkle like new again.
Why Proper Brush Cleaning Matters
Imagine you’ve just created an incredible work of landscape art using vibrant acrylics. The last thing you want is to let leftover paint dry inside your brush, turning soft bristles into stiff, unusable tools. Cleaning your brushes properly ensures:
- Durability: High-quality art brushes aren’t cheap. To make the most out of your tools, treat them with care.
- Performance: Brushes that are well-maintained will glide smoothly on your canvas the next time you’re in creative mode.
- Cost-efficiency: Regular cleaning extends the usability of your art supplies, saving you money in the long run.
Step-by-Step Guide to Quickly and Easily Wash Your Pointed Oval Brush
Step 1: Gather Your Materials
Use these simple tools, and you’re set to clean your brushes with ease. You’ll need:
- Lukewarm Water
- Gentle or Specialized Brush Soap (pro tip: Check out our gift shop for artist-quality brush cleaning soaps!)
- A Lint-Free Cloth or Paper Towel
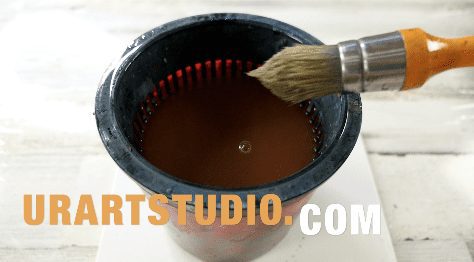
- A Small Bucket with an Inside Plastic Mesh (explained below)
- Patience (it’s worth it!)
Take note: Ordinary dish soaps can be too harsh and damage your delicate bristles, especially for brushes designed for landscape painting or detailed acrylic work!
Step 2: Use a Small Bucket With a Plastic Mesh
One of the easiest ways to remove stubborn paint residue from your brushes is by using a small bucket outfitted with a plastic mesh insert.
- Why the mesh? The textured surface allows for gentle scrubbing of your brush without damaging the bristles. It’s particularly effective at removing dried acrylic paint from deep in the bristle base, which normal rinsing might not fully clean .
- Fill the bucket with lukewarm water, then lightly scrub your brush across the insert until the paint begins to lift.
If you don’t already have one, consider browsing our brush cleaning tools and supplies to set yourself up for cleaner tools and faster cleaning times!
Step 3: Rinse Immediately After Use
The secret to avoiding stubborn dried paint on your brush? Don’t wait!
- Place your pointed oval brush under lukewarm running water, angling the bristles downward. This ensures no water gets trapped in the ferrule (the metal part holding the bristles), which could loosen the glue over time.
- Gently sweep the bristles back and forth with your fingers to encourage any leftover acrylic paint to wash away.
Step 4: Use Brush Soap for Deep Cleaning
After rinsing and scrubbing with the mesh bucket, apply a small amount of specialized brush soap to the bristles for a thorough clean.
- Swirl the soapy bristles lightly on your palm to create a lather and loosen any trapped acrylic residue.
- Extra stubborn spots? Let the soap sit for a minute or two before rinsing.
Make sure you pick the right soap or cleaner from our art product selection.
Step 5: Rinse & Repeat if Necessary
Once soap has done its magic, rinse your brush thoroughly under water. Repeat Step 4 if any paint remnants remain. Remember: “No paint left behind!”
Step 6: Restore the Perfect Brush Shape
After washing, reshape your pointed oval brush while it’s damp. Use your fingers to ensure the bristles return to their natural, rounded point — a vital step for seamless acrylic painting techniques!
Step 7: Dry Like a Pro
- Gently blot the brush bristles with a lint-free cloth or paper towel to remove excess water.
- Lay the brush flat, or better yet, hang it with the bristles pointing downward to avoid water seeping into the ferrule.
Never store damp brushes upward in a jar—this can compromise both the bristles and the ferrule’s grip, causing irreparable damage.
Bonus Tips for Brush Enthusiasts:
- Rotate Brushes Properly: If you regularly work on landscape paintings or acrylic projects, consider owning multiple pointed oval brushes. Alternate use to extend the life of each brush.
- Invest in Quality Brushes: Start with well-crafted brushes from our art shop for an optimal painting experience.
Conclusion
Caring for your pointed oval brush is easier than you think and now even more efficient with a small bucket and plastic mesh insert! By following these steps, you ensure your brushes will continue to deliver flawless strokes for your next masterpiece — be it intricate landscape art or experimental acrylic techniques. Your painting supplies are investments that deserve a little TLC!
For more painting tips, check out our blog at UrArtStudio.com, browse our step-by-step painting instructions, or shop top-quality brushes and other supplies in our gift shop!
Keywords:
- acrylic painting,
- painting tips,
- landscape painting,
- brush cleaning,
- art supplies,
- acrylic techniques,
- art brushes,
- landscape art
Hashtags:
#PaintingTips, #BrushCare, #AcrylicArt, #ArtBrushes, #LandscapePainting, #ArtistSupplies, #AcrylicPaintingTips, #ArtStudioTips


Leave a Reply
You must be logged in to post a comment.