


PART 1 — BUILDING THE COLORFUL FOUNDATION
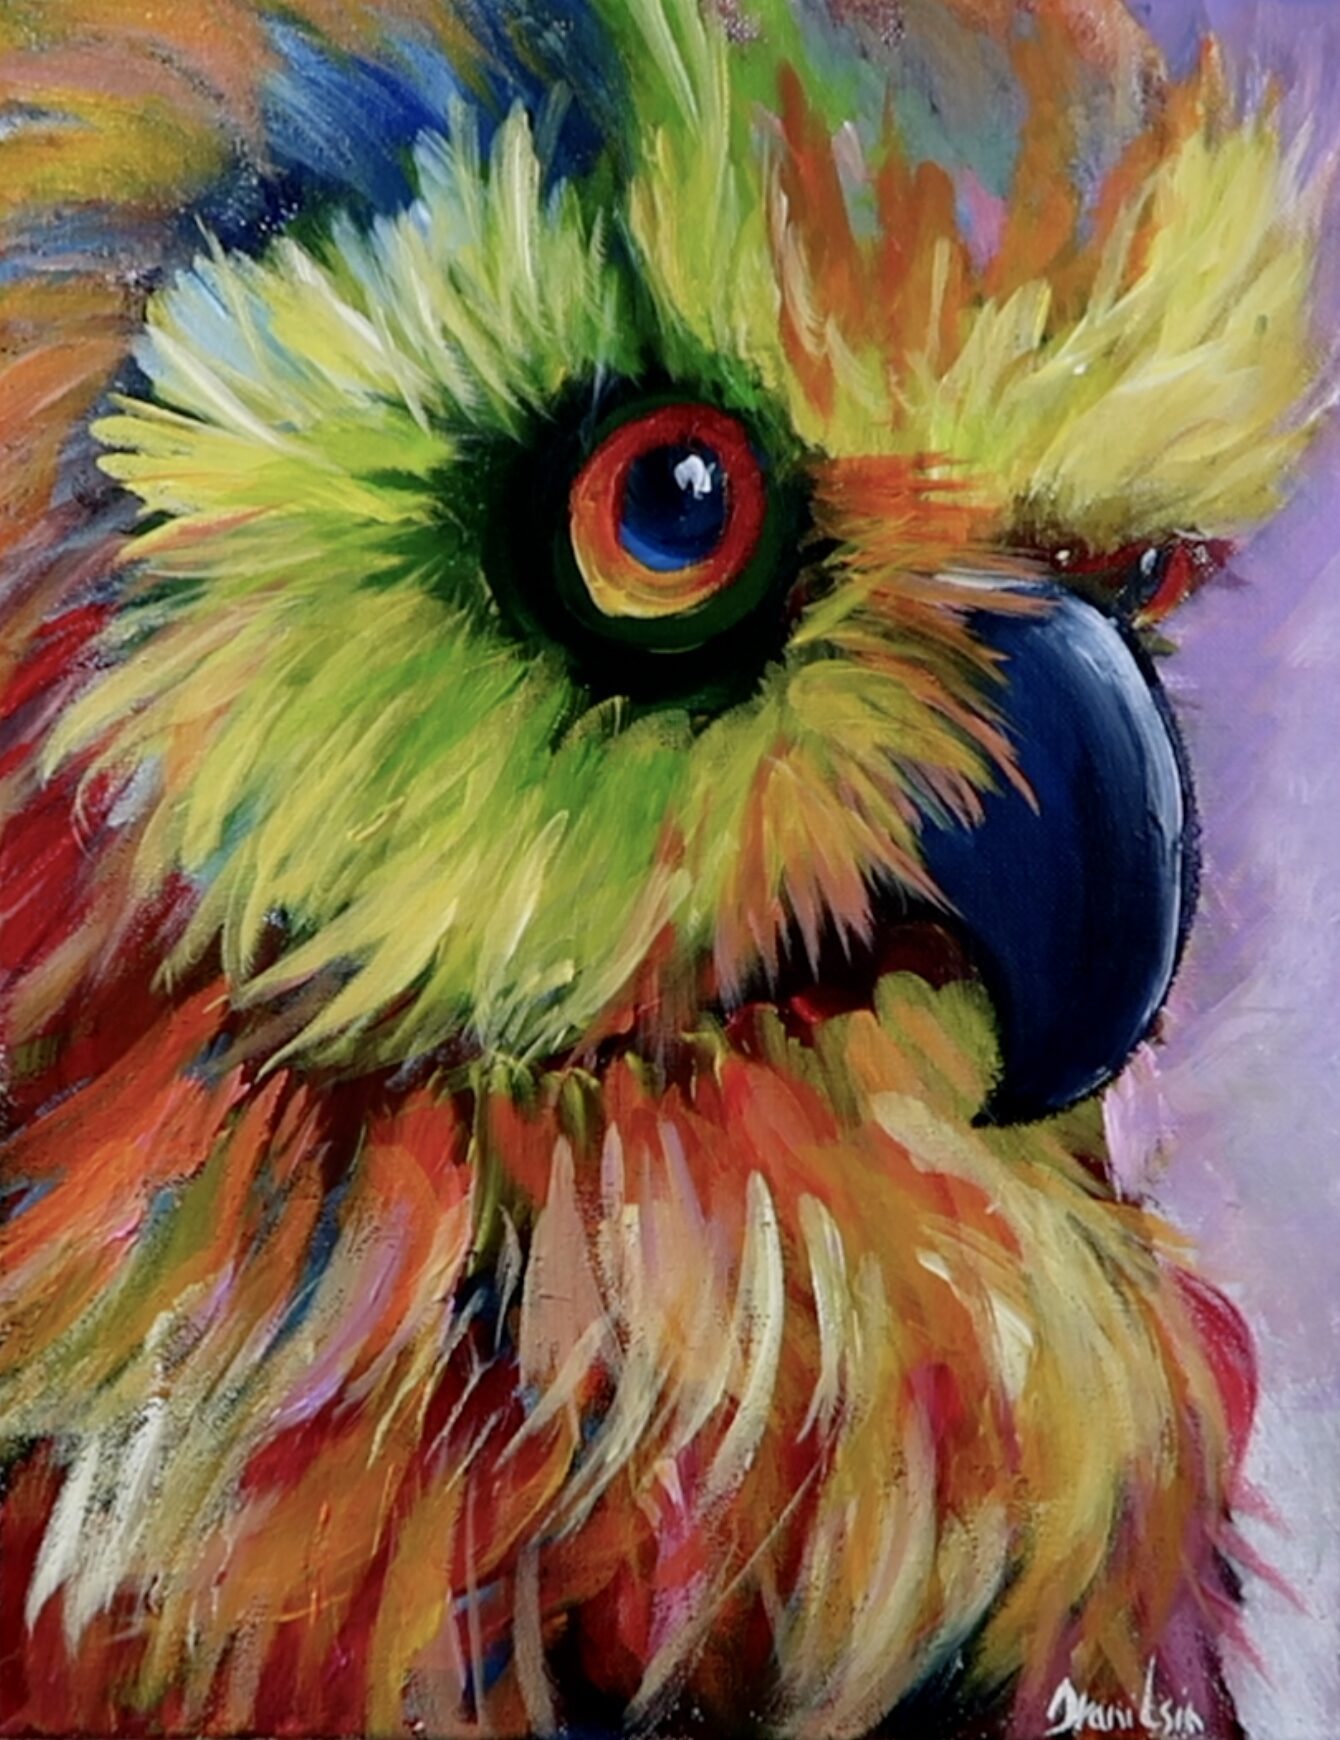
This painting is all about energy, color, personality, and expressive brushwork. The goal is not to paint every feather one by one. Instead, we will build the parrot through large color masses, directional strokes, soft transitions, and strong focal details.
The most important thing to remember from the beginning is this:
Do not over-control the painting.
A parrot is a perfect subject for loose acrylic painting because the feathers naturally allow you to use movement, broken edges, layered color, and spontaneous brush marks.
The finished painting should feel alive—not polished to the point of stiffness.
BEFORE YOU BEGIN
CANVAS PREPARATION
Use a 4:3 horizontal canvas format.
A canvas around 12 x 16 inches, 9 x 12 inches, or another similar horizontal proportion will work very well.
You may begin on:
- a white canvas,
- a lightly toned canvas,
- or a previously painted neutral surface.
For this painting, a slightly warm or muted underpainting can be especially helpful because it prevents the background from feeling too cold or sterile.
If you are using a white canvas, you may lightly tint the surface with a diluted warm neutral such as:
- Yellow Ochre,
- Burnt Sienna,
- a small amount of Vandyke Brown,
- or a mixture of warm gray.
Keep the tone very light.
The purpose is not to create a finished background at this stage.
It simply gives the painting a more unified foundation.
Make sure the canvas is completely dry before beginning the parrot.
COLOR PALETTE
This painting depends heavily on color variety.
You do not need an enormous palette, but you do want enough color to create warm and cool shifts throughout the feathers.
A useful palette would include:
- Black
- White
- Vandyke Brown
- Yellow Ochre
- Cadmium Yellow or another strong warm yellow
- Orange
- Red
- Magenta or Crimson
- Sap Green or another deep green
- Bright Green
- Ultramarine Blue
- Phthalo Blue or another strong blue
- Violet or Purple
You can simplify the palette if needed.
The key is to have:
warm colors for the orange, yellow, and red feather areas,
cool colors for the blue and violet areas,
and
dark colors for the deepest shadows around the eye, beak, and feather separations.
Do not worry about mixing the exact same color every time.
Variation is what gives the feathers life.
BRUSHES USED
A painting like this works best with several brush shapes.
BIG OVAL BRUSH
Use the Big Oval Brush for:
- broad background blending,
- larger feather masses,
- soft transitions,
- directional texture,
- and large color placement.
This brush is especially useful when you want the painting to remain loose.
Do not use too much pressure.
Let the bristles spread naturally and create broken edges.
FILBERT BRUSH
The Filbert Brush is one of the most useful brushes for the parrot.
Use it for:
- shaping the head,
- creating curved feather strokes,
- painting the large areas around the eye,
- forming the cheek,
- and building the transition into the body.
The rounded edge of the filbert naturally creates soft feather shapes.
DETAIL BRUSH / LINER BRUSH
Use the detail brush later for:
- the eye,
- feather accents,
- fine lines,
- beak highlights,
- tiny reflected lights,
- and small color separations.
Do not begin with the detail brush too early.
First build the large shapes.
Details should come later.
FAN BRUSH
A fan brush can be useful for:
- broken feather texture,
- soft feather transitions,
- directional strokes,
- and creating areas where many tiny feather shapes are suggested at once.
Use it lightly.
Avoid brushing back and forth too much.

THE COMPOSITION
Before touching the canvas, look carefully at the structure of the painting.
The parrot fills most of the canvas.
This is important.
The subject is not small and centered.
Instead, the bird feels very close to the viewer.
That gives the painting energy.
The large eye becomes the main focal point.
The beak forms the second focal area.
The feathers then explode outward around these two shapes.
Notice that the head is cropped close.
This creates a more dramatic composition.
You are not painting an entire bird.
You are painting a powerful close-up.
That allows you to focus on:
- color,
- texture,
- expression,
- and brush movement.
STEP 1 — ESTABLISH THE BACKGROUND
Begin with the background.
Do not make it too detailed.
The background should support the parrot without competing with it.
Use soft mixtures of:
- lavender,
- pale violet,
- soft blue,
- warm beige,
- muted orange,
- light gray,
- or soft green.
You can introduce several of these colors loosely.
Use the Big Oval Brush or another large soft brush.
Work with broad strokes.
Avoid creating hard shapes.
The background should feel atmospheric.
You can move the brush in:
- curved motions,
- diagonal strokes,
- soft circular blending,
- and irregular sweeping passes.
Keep some areas lighter and some darker.
This creates depth.
Do not fully blend every transition.
Allow some brush marks to remain visible.
The finished background should feel like an abstract field of color.
That gives the bird something expressive to sit against.
STEP 2 — KEEP THE CENTER AREA OPEN
As you build the background, pay attention to the future location of the parrot’s head.
Keep this area slightly lighter.
You do not need to create a glowing circle.
Just avoid making the center too dark.
A lighter background near the bird’s face helps the dark eye and beak stand out later.
Around the edges of the canvas, you can allow the background to become slightly richer and more colorful.
This creates a natural visual frame.
STEP 3 — BLOCK IN THE DARK EYE AREA
Now begin the parrot.
Start around the eye.
Use a dark mixture of:
- Black,
- Vandyke Brown,
- and a little deep green or blue.
Do not paint the eye itself yet.
First establish the dark feather mass surrounding it.
This area is essential because it creates contrast against the bright yellow-green feathers.
Use the Filbert Brush.
Create a roughly circular or oval dark shape around the eye area.
Do not make the edge perfectly smooth.
Feathers should break the edge.
Push some short strokes outward.
This immediately begins to create feather texture.
STEP 4 — BEGIN THE YELLOW-GREEN FEATHER MASS
Now mix a bright yellow-green.
You can use:
- Yellow,
- Yellow Ochre,
- Bright Green,
- and White.
Do not mix them completely into one flat color.
Instead, allow variations.
Some strokes can be greener.
Some can be more yellow.
Some can be lighter.
Use the Filbert Brush or a medium brush.
Begin placing feather strokes around the dark eye area.
Pull the strokes outward.
Think of the eye as the center of a burst.
The feathers radiate away from it.
This directional movement is one of the most important ideas in the painting.
Do not paint feathers as little leaves.
Instead, make quick confident strokes.
Some should be long.
Some short.
Some curved.
Some broken.
STEP 5 — CREATE THE FEATHER DIRECTION
Look at the reference carefully.
The feathers around the face do not all travel in the same direction.
Near the top of the head, they move upward.
Near the left side, they sweep outward.
Near the beak, they move slightly downward and forward.
Near the lower cheek, they begin flowing into the body.
Your brush strokes should follow these directions.
This helps the bird feel three-dimensional.
If all the strokes go in the same direction, the painting will flatten.
STEP 6 — INTRODUCE ORANGE INTO THE FEATHERS
Now begin warming the feather mass.
Mix Orange with:
- Yellow,
- Red,
- and occasionally a little White.
Place orange strokes between the yellow-green feathers.
Do not cover the green completely.
You want the colors to overlap.
This creates richness.
Some feathers can begin green and end orange.
Others can sit directly beside one another.
Let the colors vibrate against each other.
This is where the painting starts becoming more expressive.
STEP 7 — ADD RED ACCENTS
Introduce deeper red accents.
Use:
- Crimson,
- Red,
- and a little Vandyke Brown if you need a darker red.
Place these mostly toward:
- the left side,
- lower body,
- and deeper shadow areas.
Red should not dominate everything.
It should act as a powerful accent.
The brighter yellow and green areas should remain the visual focus around the eye.
STEP 8 — ESTABLISH THE BLUE BEAK
Now begin the beak.
The beak is large and dark.
Use a mixture of:
- Ultramarine Blue,
- Black,
- and a little White.
Do not use pure black alone.
Adding blue makes the beak feel richer.
Block in the large curved shape first.
Ignore small details.
Think of the beak as one strong dark mass.
The top curve should feel smooth and powerful.
The lower edge can disappear slightly into shadow.
STEP 9 — GIVE THE BEAK FORM
Now introduce lighter blue.
Mix Blue with White.
Add a soft highlight along the upper and outer curve of the beak.
Do not outline the entire shape.
Instead, create a partial highlight.
The darkest area should remain near the underside and inner edge.
This creates roundness.
You can soften some of the transition using your finger if the paint is still wet.
Use very gentle pressure.
Drag the paint slightly.
Do not smear the entire beak.
You only want to soften selected areas.
STEP 10 — PLACE THE EYE
Now paint the eye.
The eye is one of the most important parts of the entire composition.
Begin with a dark circular shape.
Use Black mixed with a little Blue.
Then add:
- a warmer red or orange ring,
- possibly a green or yellow outer ring,
- and a tiny white highlight.
The highlight should be small.
Do not make it too large.
The tiny reflection is what gives the eye life.
Take your time here.
Even though the rest of the painting can remain loose, the eye should feel convincing.
STEP 11 — BUILD COLOR AROUND THE EYE
Now return to the surrounding feathers.
Use short strokes of:
- Yellow,
- Yellow-Green,
- Orange,
- White,
- and small touches of Blue or Violet.
Layer these around the eye.
Do not cover the dark base completely.
Allow the dark areas to show through between feather strokes.
Those dark gaps help separate the feathers naturally.
This is much easier than painting outlines around every feather.
STEP 12 — AVOID OVER-BLENDING
This is very important.
Do not blend the feathers until they become smooth.
The power of the painting comes from visible brushwork.
You want to see:
- individual strokes,
- broken edges,
- overlapping colors,
- dry-brush texture,
- and small areas where the canvas still shows through.
If the area becomes too smooth, stop.
Add a few stronger directional strokes on top.
STEP 13 — BEGIN THE BODY MASS
Now extend the color downward.
The body contains stronger mixtures of:
- Red,
- Orange,
- Yellow,
- Green,
- Brown,
- and occasional Blue.
Use larger strokes here.
The body feathers can be longer than the facial feathers.
Pull them downward and diagonally.
Allow them to overlap.
Do not worry about perfect anatomy.
The painting is expressive.
The body should feel like a flowing mass of color.
STEP 14 — CREATE DEPTH WITH DARK FEATHERS
Mix Black with Vandyke Brown and Blue.
Place a few dark feather shapes between the brighter colors.
These dark strokes help separate the layers.
They create depth.
Use them sparingly.
Too much dark paint will make the painting heavy.
The goal is contrast.
Bright feather.
Dark gap.
Bright feather.
Dark gap.
This rhythm creates visual movement.
STEP 15 — STEP BACK
At this point, stop painting for a moment.
Move several feet away from the canvas.
Look at the painting as a whole.
Ask yourself:
Is the eye clearly the focal point?
Is the beak strong enough?
Do the feather colors radiate outward naturally?
Is there enough dark contrast?
Is the background still visible?
Does the bird feel energetic rather than overworked?
Do not judge tiny details yet.
Part 1 is about establishing the foundation.
The painting should already feel like a parrot even though many details are still missing.
IMPORTANT LESSON FROM PART 1
The main idea of this first stage is:
Build the bird with color masses first, feathers second, and details last.
If you begin with tiny details too early, the painting will become stiff.
Large shapes create the structure.
Directional brushwork creates the feathers.
Contrast creates depth.
Color creates personality.
In the next part, we can move deeper into:
- refining the eye,
- strengthening the beak,
- layering the facial feathers,
- developing the red and orange body,
- adding cool blue accents,
- creating more dimensional feather separation,
- using fingers to soften and manipulate selected areas,
- and beginning the detailed highlight work.
PART 2 — DEVELOPING THE FACE, BEAK, AND FEATHER STRUCTURE
Now that the main composition, color masses, eye area, and basic beak are established, we can begin refining the parrot without losing the loose expressive quality of the painting.
This stage is where the subject starts to feel more alive.
The goal is not to make everything sharper.
The goal is to create better separation between shapes, stronger dimensional form, richer feather direction, and a more convincing focal area around the eye and beak.
STEP 16 — REINFORCE THE DARK STRUCTURE AROUND THE EYE
Return to the dark area surrounding the eye.
Mix:
- Black
- Vandyke Brown
- a small amount of Ultramarine Blue
Use a medium Filbert Brush.
Strengthen the darkest areas immediately around the eye.
Do not create a perfect circle.
Instead, allow the dark shape to break outward into nearby feathers.
Think of the dark area as a shadow pocket.
It should help the eye feel embedded inside the head rather than pasted on top.
Keep the center strong and dark.
Then let the edges become irregular and feathered.
STEP 17 — BRING BACK THE YELLOW-GREEN FEATHERS
Now reload the brush with a mixture of:
- Yellow
- Bright Green
- Yellow Ochre
- a touch of White
Place fresh strokes around the dark eye area.
Use confident movements.
Pull the feathers outward from the eye.
Do not make every stroke identical.
Some should be:
- thin,
- broad,
- curved,
- broken,
- or partially blended.
This variation keeps the painting lively.
Let some yellow-green strokes overlap the darker area slightly.
That overlap makes the feathers feel layered.
STEP 18 — ADD LIGHTER FEATHER ACCENTS
Mix:
- White
- Yellow
- a touch of Green
Create a lighter yellow-green.
Use a smaller Filbert or detail brush.
Add selected highlights to the feather edges around the eye.
Do not cover all the feathers.
Think of these as catches of light.
Place them where the feathers turn toward the light.
The lightest marks should remain limited.
If everything becomes bright, the painting loses depth.
STEP 19 — DEVELOP THE ORANGE TRANSITION
Move outward from the yellow-green feather mass.
Mix:
- Orange
- Yellow
- a small amount of Red
Begin connecting the bright face feathers to the warmer body area.
Use longer strokes now.
The feather direction should start becoming more diagonal and downward.
This creates a natural transition from head to body.
Allow some strokes to overlap the green.
Do not blend all the boundaries.
The contrast between green and orange is part of the painting’s energy.
STEP 20 — INTRODUCE RED INTO THE LOWER FEATHERS
Use a deeper mixture of:
- Red
- Orange
- Vandyke Brown
Place this color beneath and between the brighter orange strokes.
The deeper red gives the body weight.
Use it in:
- shadow pockets,
- lower feather layers,
- and areas where the plumage turns away from the light.
Do not spread red evenly.
It should appear in concentrated areas.
That irregular placement makes the feather structure more natural.
STEP 21 — CREATE FEATHER LAYERS
This is an important stage.
Instead of painting all feathers on one flat level, build them in layers.
Start with a darker underlayer.
Then place medium-value strokes over it.
Finish with lighter highlights.
Think of it like this:
dark feather base
medium warm color
light tip or edge
This creates depth without needing to outline each feather.
Repeat this process across the body.
STEP 22 — USE THE FILBERT TO CREATE FEATHER SHAPES
The Filbert Brush is ideal here because its rounded shape naturally creates soft feather ends.
Load the brush with Orange or Yellow.
Press lightly.
Pull the brush outward.
Lift at the end.
This creates a tapered feather.
Repeat with variation.
Do not make them too regular.
Some strokes should overlap.
Some should disappear into the dark underpainting.
Some should remain bright.
STEP 23 — BEGIN DEFINING THE BEAK MORE CLEARLY
Return to the beak.
Mix:
- Ultramarine Blue
- Black
- a little White
Reinforce the large curved shape.
The upper portion should remain dark but not completely black.
Use blue-black so the beak feels rich.
Now look for the main curve.
Follow it carefully.
The beak should feel smooth and solid compared with the rough feather texture around it.
This contrast is important.
STEP 24 — ADD THE BEAK HIGHLIGHT
Mix:
- Blue
- White
Create a cool medium-light blue.
Place a highlight along the outer curve of the beak.
Keep it narrow.
Do not outline the entire beak.
The highlight should taper.
It can be stronger near the center of the curve and softer near the edges.
This creates a sense of roundness.
STEP 25 — SOFTEN THE BEAK WITH YOUR FINGER
If the paint is still wet, use a clean finger.
Very gently drag across part of the highlight.
This softens the transition.
Use only one or two passes.
Do not over-smudge.
The goal is to create a subtle transition between the dark beak and the reflected light.
Your finger is not replacing the brush.
It is simply softening selected edges.
STEP 26 — DEFINE THE BEAK EDGE NEAR THE FACE
Use a small detail brush.
Mix a dark color using:
- Black
- Vandyke Brown
- Blue
Strengthen the area where the beak meets the face.
This creates separation.
Keep this edge darker than the outer beak.
That makes the beak appear to emerge forward.
STEP 27 — REFINE THE EYE
Now we can develop the eye.
Use a small detail brush.
Begin with the dark center.
Paint the pupil deep Black or Blue-Black.
Then reinforce the colored rings around it.
Use small amounts of:
- Red
- Orange
- Yellow
- Green
Keep these colors thin and controlled.
Do not make the eye look like a perfect graphic symbol.
Allow small irregularities.
That gives it character.
STEP 28 — ADD THE EYE REFLECTION
Mix pure White.
Use the tip of the detail brush.
Add one small white reflection.
Then, if desired, add a second tiny mark beside it.
The smaller the highlight, the more believable the eye becomes.
Do not make a large white dot.
A tiny highlight is enough.
STEP 29 — DARKEN THE SHADOW BELOW THE EYE
Mix Black and Vandyke Brown.
Place a little dark paint beneath the eye.
This increases the contrast.
You can lightly blend the lower edge into nearby feathers.
This helps the eye feel recessed.
STEP 30 — ADD BLUE ACCENTS AROUND THE FACE
The painting benefits from small cool accents.
Mix:
- Ultramarine Blue
- a little White
- possibly a touch of Violet
Place small blue strokes between some of the warm yellow and orange feathers.
This creates color contrast.
Do not use too much.
The cool blue should act as a surprise accent.
It also connects visually to the blue beak.
STEP 31 — USE GREEN TO UNIFY THE FACE
Return to Green.
Mix:
- Green
- Yellow
- a little White
Place a few green strokes between the yellow, orange, and red feathers.
This helps unify the face.
The green should be stronger near the eye and softer as it moves into the body.
STEP 32 — BUILD THE FOREHEAD AND CREST FEATHERS
At the top of the head, use longer strokes.
Mix:
- Yellow
- Green
- White
- occasional Orange
Pull the strokes upward.
Let some overlap one another.
Keep the tips light and irregular.
The crest should feel energetic.
Avoid making it symmetrical.
One side can be fuller than the other.
That asymmetry gives the bird more personality.
STEP 33 — ADD DARK GAPS BETWEEN FEATHERS
Mix Black and Vandyke Brown.
Use a smaller brush.
Add a few narrow dark gaps between selected feather groups.
Do not outline every feather.
Just add shadow where one layer overlaps another.
These dark separations create more depth.
STEP 34 — DEVELOP THE LOWER BODY
Move downward.
Use larger strokes.
The lower body should contain stronger mixtures of:
- Orange
- Red
- Yellow
- Green
- Brown
- Blue
This area can be more abstract than the face.
Let the brushwork become expressive.
Use long strokes.
Overlap colors.
Leave some underpainting visible.
The body does not need the same level of detail as the eye.
STEP 35 — CREATE LONGER FEATHER STROKES
Use a larger Filbert Brush.
Load it with Orange or Yellow.
Pull the paint downward.
Then repeat with Red.
Then add small Green and Blue accents.
This creates the layered plumage.
The strokes should not all begin or end at the same place.
Vary their lengths.
STEP 36 — ADD DARK SHADOWS BETWEEN BODY FEATHERS
Mix:
- Black
- Vandyke Brown
- Blue
Add dark strokes underneath selected feather layers.
These shadows make the bright feathers stand out.
Keep them loose.
Do not create heavy outlines.
STEP 37 — DRY-BRUSH SELECTED FEATHERS
Use a brush with very little paint.
Load it with a light Yellow or White mixture.
Wipe off most of the paint.
Then drag lightly across the feather surface.
This creates broken highlights.
The texture should catch only the raised canvas.
This dry-brush effect is excellent for feathers.
STEP 38 — USE YOUR FINGERS TO SOFTEN SELECTED FEATHERS
If some areas look too sharp, use a clean finger.
Drag gently along the direction of the feathers.
This can soften transitions.
Use it especially where:
- Green meets Yellow,
- Orange meets Red,
- or the body disappears into the background.
Do not finger-blend the whole bird.
Keep some areas crisp.
Keep others soft.
The contrast between hard and soft edges adds depth.
STEP 39 — CREATE A STRONGER EDGE AROUND THE BEAK
Return to the outer beak.
Use the detail brush.
Add a thin dark line along one section of the edge.
Then place a small light accent nearby.
The dark and light combination creates a sharper focal edge.
This should be one of the cleanest areas in the painting.
STEP 40 — SOFTEN THE BACK EDGE OF THE HEAD
The opposite side of the head can remain softer.
Blend some feathers slightly into the background.
Use:
- dry brushing,
- gentle finger blending,
- or a soft Filbert stroke.
This creates depth.
The front of the face stays sharp.
The back becomes softer.
This naturally directs attention toward the eye and beak.
STEP 41 — CHECK YOUR COLOR BALANCE
Step back again.
Look at the overall distribution of color.
You should see:
- bright yellow-green around the eye,
- warm orange and red through the body,
- blue in the beak,
- dark shadow areas for contrast,
- and scattered cool accents.
If one color dominates too much, introduce its opposite.
If the painting feels too warm, add blue or green.
If it feels too cool, add yellow, orange, or red.
STEP 42 — REINFORCE THE MAIN LIGHT SOURCE
Decide where the strongest light is coming from.
In this painting, the brightest areas should remain around:
- the eye,
- upper facial feathers,
- upper edge of the beak,
- and selected feather tips.
Do not highlight everything equally.
The light should guide the viewer.
STEP 43 — ADD SELECTIVE WHITE HIGHLIGHTS
Mix White with a small amount of Yellow.
Use a fine brush.
Place a few light feather strokes around the face.
These should be the brightest feather accents.
Keep them limited.
They will appear much stronger against the dark underlayers.
STEP 44 — REFINE THE FEATHER RHYTHM
Look at the direction of the strokes.
Make sure they flow naturally.
The feather rhythm should move:
outward from the eye,
forward toward the beak,
upward at the crest,
and downward into the body.
This directional flow is what makes the painting feel alive.
STEP 45 — DO NOT OVER-FINISH
This is one of the most important lessons.
The face can be detailed.
The beak can be defined.
The eye can be sharp.
But the rest of the bird should remain expressive.
Do not try to make every feather perfect.
The loose areas make the detailed focal areas more powerful.
WHAT PART 2 SHOULD ACHIEVE
At the end of this stage, the parrot should feel much more dimensional.
The eye should clearly command attention.
The beak should feel rounded and solid.
The head should contain layered yellow-green, orange, red, and blue accents.
The body should begin to flow downward in long expressive strokes.
The painting should still feel loose and energetic.
IMPORTANT LESSON FROM PART 2
The main idea here is:
Detail should be concentrated, not distributed everywhere.
The eye and beak deserve precision.
The feathers deserve movement.
The background deserves softness.
When each area has a different level of finish, the painting becomes more dynamic.
In the next part, we can continue with:
- richer body feather layering,
- stronger reds and oranges,
- additional green and blue accents,
- dry-brush texture,
- more finger manipulation,
- background integration,
- final highlights,
- edge control,
- splatter or spontaneous marks if appropriate,
- and the finishing touches that unify the entire painting.
PART 3 — BUILDING RICH BODY FEATHERS, COLOR DEPTH, AND EXPRESSIVE TEXTURE
Now the parrot has a recognizable face, strong eye, defined beak, and established feather direction.
Part 3 is where the painting becomes much more exciting.
This stage focuses on the body feathers, richer color layering, controlled contrast, finger blending, broken brushwork, and expressive texture.
The goal is to make the plumage feel full and dimensional without turning the painting into a collection of individually outlined feathers.
The body should feel like a cascade of color.
STEP 46 — STRENGTHEN THE BODY SHAPE
Begin by looking at the overall silhouette.
The lower body should feel broad and full.
If the body appears too narrow, extend selected feather masses outward.
Use a medium Filbert Brush.
Mix a dark base using:
- Vandyke Brown
- Black
- a little Ultramarine Blue
Place this dark color underneath the brighter feather areas.
This becomes the shadow structure that will support everything you add next.
Do not create a perfect outline around the bird.
Let some edges disappear into the background.
STEP 47 — BUILD THE RED FEATHER MASS
Now begin strengthening the warmest areas.
Mix:
- Red
- Orange
- a little Vandyke Brown
Use long downward strokes.
Place the red mostly through the lower and left portions of the body.
Do not cover every dark area.
Allow dark gaps to remain.
These gaps create natural separation between feather layers.
STEP 48 — ADD BRIGHT ORANGE OVER THE RED
Mix:
- Orange
- Yellow
- a small amount of Red
Place brighter strokes over portions of the red base.
Use a lighter touch.
Let the brush glide over the surface rather than pressing heavily.
The orange strokes should look as if they sit on top of deeper red feathers.
Vary their length and width.
STEP 49 — ADD GOLDEN YELLOW FEATHERS
Now introduce brighter yellow.
Mix:
- Cadmium Yellow
- Yellow Ochre
- a little White
Place selected strokes over the orange.
Keep them concentrated near the upper body and around the transition from face to chest.
Do not make the entire body yellow.
The yellow should create flashes of light.
STEP 50 — INTRODUCE COOL GREEN ACCENTS
The painting becomes more interesting when warm and cool colors sit beside each other.
Mix:
- Bright Green
- Yellow
- a little White
Add green strokes between selected red, orange, and yellow feather groups.
Use them sparingly.
These green accents help connect the body back to the face.
STEP 51 — ADD BLUE AND VIOLET SHADOWS
Now mix:
- Ultramarine Blue
- Violet
- a small amount of Black
Place a few cool shadow strokes between the warm feather masses.
These should be subtle.
The goal is not to turn the body blue.
The cool color should appear in deeper spaces between feathers.
This creates more depth.
STEP 52 — WORK IN LAYERS
Think of the body in three levels.
First:
dark underpainting
Second:
mid-tone feather colors
Third:
bright highlights
Do not jump straight to the brightest colors.
If you build each layer gradually, the feathers will feel dimensional.
STEP 53 — USE THE FILBERT FOR LONG FEATHER STROKES
Load the Filbert Brush with Orange.
Place the brush near the body.
Pull downward.
Lift as you move.
This creates a tapered stroke.
Repeat with Red.
Repeat with Yellow.
Repeat with Green.
Let the colors overlap.
Do not make the strokes perfectly parallel.
Slight variation makes them more natural.
STEP 54 — CREATE BROKEN FEATHER EDGES
Use a nearly dry brush.
Load it lightly with a bright color.
Drag the brush across the darker body.
Allow the bristles to skip across the surface.
This creates broken texture.
These broken marks are excellent for feather edges because they prevent the painting from looking too smooth.
STEP 55 — ADD FEATHER CLUSTERS
Instead of thinking about individual feathers, think about small groups.
Create a cluster of three or four strokes.
Then leave a dark gap.
Then create another cluster.
This rhythm works beautifully.
It gives the body variation.
Avoid covering the entire surface evenly.
STEP 56 — SOFTEN SELECTED FEATHERS WITH YOUR FINGERS
Now use your fingers selectively.
If a group of feathers looks too rigid, lightly drag your finger along the direction of the strokes.
This can soften the transition between:
- Yellow and Orange
- Orange and Red
- Green and Yellow
- Blue and shadow
Use very little pressure.
Do not rub back and forth.
One gentle directional motion is enough.
STEP 57 — PULL COLOR OUTWARD
Your fingers can also help extend feather edges.
Place your fingertip at the edge of a wet color area.
Pull outward.
This creates a softer taper.
Use this especially around the outer body where you want the feathers to dissolve slightly into the background.
STEP 58 — REINFORCE THE DEEPEST SHADOWS
Now step back and identify the darkest zones.
Mix:
- Black
- Vandyke Brown
- a little Blue
Strengthen the deepest shadows between larger feather groups.
Do not place these everywhere.
A few strong dark areas are enough to create depth.
STEP 59 — ADD WARM SHADOWS
Not every shadow needs to be black.
Mix Vandyke Brown with Red.
Use this warm dark mixture under Orange and Yellow feathers.
This creates a more natural transition than pure black.
STEP 60 — CREATE COLOR ECHOES
To unify the painting, repeat colors in different areas.
For example:
Add a little green into the lower body.
Add a touch of orange near the face.
Add a small blue stroke near the eye.
Repeat red in more than one section.
These color echoes connect the painting visually.
STEP 61 — STRENGTHEN THE TRANSITION BETWEEN HEAD AND BODY
The area where the face meets the body can sometimes feel abrupt.
Use overlapping strokes of:
- Yellow
- Green
- Orange
- Red
Let these colors gradually shift downward.
This creates a smoother visual transition.
STEP 62 — ADD SMALL DARK FEATHER BREAKS
Use a detail brush.
Mix Black and Vandyke Brown.
Place a few short dark marks between some of the brighter feathers.
Do not outline complete shapes.
These marks should look like small shadow separations.
They help define layers.
STEP 63 — BEGIN ADDING LIGHTER BODY HIGHLIGHTS
Mix:
- White
- Yellow
- Orange
Use a smaller Filbert Brush.
Add selected bright strokes.
Keep them limited.
Focus on the upper surfaces of feather groups.
These highlights should feel spontaneous.
STEP 64 — USE WHITE SPARINGLY
Pure White is very strong.
Avoid using it across the body too early.
Instead, soften White with:
- Yellow
- Orange
- Green
- or Blue
This creates more natural highlights.
Reserve pure White for the brightest accents near the end.
STEP 65 — BUILD THE COLORFUL LOWER FEATHERS
The lower feathers can be more abstract.
Use:
- Red
- Orange
- Yellow
- Violet
- Green
- Blue
Allow these colors to mix visually rather than physically.
Place them beside one another.
Let the viewer’s eye blend them.
This creates vibrancy.
STEP 66 — ADD VIOLET AND MAGENTA
A small amount of Magenta or Violet can create beautiful color complexity.
Place these tones between some of the red and blue areas.
Do not overuse them.
They should act as accents.
STEP 67 — CREATE LONG SWEEPING FEATHERS
Use a larger brush.
Pull longer strokes downward.
Let some begin wide and end narrow.
These long feathers help create the body’s overall flow.
The painting becomes more dynamic when large strokes are mixed with small strokes.
STEP 68 — BREAK THE EDGE OF THE BODY
Do not keep the outer body edge clean.
Use dry brushing and finger blending to soften portions.
Let some feather tips disappear.
Then create a few sharper feather points nearby.
This contrast between lost and found edges adds depth.
STEP 69 — CHECK THE SILHOUETTE
Step away again.
Look only at the outer shape of the bird.
Does the silhouette feel balanced?
Is one side too heavy?
Are the feathers flowing naturally?
If needed, extend a few strokes outward.
Remove or soften others.
STEP 70 — RETURN TO THE EYE FOR BALANCE
After working on the body, the eye may begin to feel too weak.
Reinforce the dark center.
Add the tiny white reflection again if needed.
Strengthen the warm ring around it.
This restores the focal point.
STEP 71 — REINFORCE THE BEAK HIGHLIGHT
The body now contains more color and contrast.
The beak may need a slightly stronger highlight.
Mix Blue with White.
Add a thin curved highlight.
Keep it subtle.
STEP 72 — ADD A SMALL WARM REFLECTION TO THE BEAK
You can introduce a tiny touch of warm reflected color near the beak.
Mix:
- Orange
- Brown
- a little Red
Place a very small warm accent near the area where feathers meet the beak.
This helps visually connect the beak to the warm face.
STEP 73 — BUILD MORE TEXTURE AROUND THE CHEEK
Use a smaller brush.
Place short feather strokes around the cheek.
Mix:
- Yellow
- Orange
- Green
- White
Vary the direction slightly.
Keep the brightest feathers near the front.
STEP 74 — CREATE COLOR TEMPERATURE CHANGES
A good painting needs warm and cool variation.
Warm areas:
- Orange
- Yellow
- Red
Cool areas:
- Blue
- Green
- Violet
Place cool colors beside warm colors.
This creates vibration.
STEP 75 — USE THE FAN BRUSH FOR SOFT TEXTURE
Load a Natural Bristle Fan Brush very lightly.
Use Yellow or Orange.
Tap or lightly drag the brush over selected feather areas.
This creates multiple broken marks at once.
Use the fan brush sparingly.
Too much can create repetitive texture.
STEP 76 — DRY-BRUSH THE BODY
Use a dry Filbert or Fan Brush.
Load with a light mixture.
Remove most of the paint.
Then skim across the feather surface.
This creates subtle broken highlights.
STEP 77 — ADD A FEW SHARP FEATHER TIPS
Use a smaller brush.
Create a few crisp feather tips.
Place them only in selected areas.
These sharp edges contrast nicely with softer areas.
STEP 78 — SOFTEN THE LOWER BODY INTO THE BACKGROUND
The lower body does not need a hard boundary.
Use a nearly dry brush or finger.
Blend a few edges into the background.
This creates atmosphere.
STEP 79 — ADD BACKGROUND COLOR NEAR THE BODY
Sometimes the easiest way to shape the bird is to paint the background around it.
Mix a background color.
Paint into selected edges.
This can refine the silhouette.
It also creates interesting lost edges.
STEP 80 — CREATE COLOR REFLECTIONS IN THE BACKGROUND
Pick up a very small amount of color from the bird.
For example:
Orange.
Green.
Violet.
Place faint touches into the nearby background.
Blend them softly.
This makes the subject feel integrated into the environment.
STEP 81 — DO NOT MAKE THE BACKGROUND TOO BUSY
The background should remain secondary.
If it becomes too colorful or detailed, soften it.
Use a large soft brush.
Gently blend.
Keep the strongest contrast around the parrot.
STEP 82 — REESTABLISH THE DARKEST DARKS
Now compare the painting.
Where is the darkest dark?
It should likely be:
- around the eye,
- inside the beak shadow,
- and between major feather groups.
Reinforce these selectively.
Strong darks make the bright colors glow.
STEP 83 — REESTABLISH THE LIGHTEST LIGHTS
Now identify the lightest areas.
These should be small.
Use White mixed with Yellow.
Add selected feather highlights.
Keep pure White extremely limited.
STEP 84 — ADD RHYTHM TO THE FEATHER STROKES
Look at the body.
If the strokes feel repetitive, change the rhythm.
Use:
long stroke
short stroke
dark gap
bright stroke
soft blend
sharp accent
This variety creates natural movement.
STEP 85 — AVOID SYMMETRY
The parrot should not look overly symmetrical.
One side can contain more orange.
Another side can contain more green.
One section can have longer feathers.
Another can be softer.
Asymmetry makes the painting feel more alive.
STEP 86 — USE YOUR FINGER TO CREATE FEATHER FUSION
In a few selected areas, blend two nearby colors with your fingertip.
For example:
Orange into Yellow.
Green into Yellow.
Blue into dark shadow.
The blended section should remain small.
This creates soft transitions between more defined strokes.
STEP 87 — RESTORE TEXTURE AFTER BLENDING
Finger blending can sometimes make an area too smooth.
If that happens, return with the brush.
Add a few fresh strokes on top.
This restores texture.
STEP 88 — CHECK THE OVERALL COLOR ENERGY
Step back.
The painting should feel colorful but not chaotic.
You want:
strong warm areas,
cool accents,
deep shadows,
and bright highlights.
If everything feels equally bright, darken a few shadow areas.
If everything feels too dark, add selected highlights.
STEP 89 — LET SOME AREAS REMAIN UNFINISHED
This is important.
Do not refine every part.
Leave some body areas rough.
Let brush marks remain visible.
Allow bits of underpainting to show.
These unfinished areas contribute to the expressive style.
STEP 90 — PREPARE FOR FINAL DETAILS
At this point, the parrot should feel complete in overall form.
The remaining stages should focus on refinement rather than reconstruction.
Do not make large structural changes unless necessary.
The main work now becomes:
- feather highlights,
- beak accents,
- eye refinement,
- background balancing,
- selective edge sharpening,
- and final expressive touches.
IMPORTANT LESSON FROM PART 3
The key lesson in this section is:
Color layering creates feathers more effectively than outlining them.
Dark layers give depth.
Mid-tones create form.
Bright strokes create life.
Finger blending creates softness.
Dry brushing creates texture.
And visible brushwork keeps the painting expressive.
The bird should now feel full, colorful, and dimensional without becoming overly polished.
In the next part, we can move into the final refinement stage—strengthening focal details, balancing the background, adding the brightest feather highlights, refining the beak and eye, adjusting edges, and bringing the entire painting together.
PART 4 — FINAL REFINEMENT, HIGHLIGHTS, EDGE CONTROL, AND FINISHING TOUCHES
At this point, the parrot should already feel colorful, dimensional, and recognizable.
The eye should be established.
The beak should have volume.
The face should contain strong yellow-green color.
The body should be filled with layered red, orange, yellow, green, blue, and violet feather strokes.
Now the goal is not to add more everywhere.
The goal is to decide what deserves attention, what should stay loose, what should become sharper, and what should quietly disappear into the surrounding color.
This is the stage where the painting becomes finished.
STEP 91 — STEP BACK BEFORE TOUCHING ANYTHING
Before adding another brushstroke, move away from the canvas.
Look at the painting from several feet back.
Ask yourself:
- Where does my eye go first?
- Is the parrot’s eye clearly the focal point?
- Is the beak strong enough?
- Are the brightest colors concentrated in the right places?
- Are there enough dark areas to support the light feathers?
- Does the body feel dimensional?
- Are some edges sharp and others soft?
- Is the background helping the bird or competing with it?
Do not immediately correct everything you notice.
First decide which adjustments matter most.
STEP 92 — REESTABLISH THE EYE AS THE MAIN FOCAL POINT
The eye should remain the strongest detail in the painting.
Use a small detail brush.
Reinforce the dark pupil with:
- Black
- a touch of Ultramarine Blue
Then strengthen the colored ring using:
- Red
- Orange
- Yellow
- and possibly a tiny touch of Green
Keep the ring uneven.
Natural variation makes the eye more believable.
STEP 93 — ADD THE FINAL EYE HIGHLIGHT
Use nearly pure White.
Add one very small highlight.
If the eye already has one, simply refresh it.
A second tiny pinpoint can be added nearby if needed.
Do not make the highlight too large.
A small mark creates more life than a big white dot.
STEP 94 — DARKEN THE EYE SOCKET
Mix:
- Black
- Vandyke Brown
- a little Green or Blue
Place this dark mixture immediately around selected parts of the eye.
Do not completely outline it.
The dark should disappear into the surrounding feather mass.
This gives the eye more depth.
STEP 95 — ADD THE BRIGHTEST FACIAL FEATHERS
Mix:
- White
- Cadmium Yellow
- a touch of Green
Use a small Filbert or detail brush.
Add only a few bright feather strokes around the eye.
Place them where you want the light to feel strongest.
These may become some of the brightest marks in the entire painting.
Keep them limited.
STEP 96 — STRENGTHEN THE GREEN FEATHER RING
The green surrounding the eye helps define the parrot’s character.
Mix:
- Bright Green
- Yellow
- a small amount of White
Place fresh strokes around the darker eye area.
Let some green strokes remain strong.
Let others blend into Yellow.
This variation prevents the green from looking like a flat band.
STEP 97 — ADD WARM FEATHER ACCENTS AROUND THE FACE
Now introduce Orange and Red again.
Mix:
- Orange
- Red
- Yellow
Place a few warm strokes near the transition from the eye toward the beak and lower cheek.
Do not add too many.
These accents create heat within the color composition.
STEP 98 — REFINE THE BEAK SHAPE
Return to the beak.
Use a medium or small Filbert.
Mix:
- Ultramarine Blue
- Black
- a little White
Strengthen the darkest areas first.
Then refine the outer curve.
The beak should feel smooth and solid compared with the textured feathers.
STEP 99 — ADD A COOL BEAK HIGHLIGHT
Mix:
- Ultramarine Blue
- White
Place a narrow highlight along part of the outer curve.
Do not follow the entire contour.
Let the highlight fade.
This creates a rounded form.
STEP 100 — ADD A SMALL REFLECTED COLOR
A very subtle touch of warm reflected color can make the beak more interesting.
Mix:
- Orange
- Vandyke Brown
- a little Red
Place a tiny warm accent near the area where the beak meets the feathers.
Keep it subtle.
This helps integrate the beak into the surrounding warm plumage.
STEP 101 — SHARPEN ONLY THE MOST IMPORTANT EDGE
The cleanest edge should usually appear around the eye and beak.
Use the detail brush to sharpen selected areas.
Do not sharpen the entire bird.
This is important.
If every edge becomes crisp, the painting loses depth.
STEP 102 — SOFTEN THE OPPOSITE SIDE OF THE HEAD
Use a dry brush or clean finger.
Gently soften a few feathers on the far side of the head.
This creates a lost edge.
Now the face has contrast:
sharp in front,
soft behind.
That naturally guides the viewer toward the eye and beak.
STEP 103 — ADD FINAL YELLOW HIGHLIGHTS
Mix:
- Yellow
- White
- a touch of Yellow Ochre
Place a few narrow strokes in the brightest feather clusters.
Avoid covering darker layers underneath.
The highlight should sit on top of the painting.
STEP 104 — ADD FINAL ORANGE HIGHLIGHTS
Mix:
- Orange
- Yellow
- a touch of White
Add a few bright orange feather strokes.
These work especially well in the lower face and upper body.
Use them as accents, not as a full layer.
STEP 105 — ADD RED ACCENTS TO THE BODY
Use:
- Red
- a little Magenta
- a tiny amount of Orange
Place selected red strokes in the lower plumage.
Keep some deep and some bright.
The red should feel rich rather than flat.
STEP 106 — ADD COOL BLUE ACCENTS
Use:
- Ultramarine Blue
- White
Place a few cool strokes within the body.
These can appear between warm feathers.
The cool color adds visual vibration.
It also ties the body back to the blue beak.
STEP 107 — ADD VIOLET WHERE COLORS MEET
A little Violet can help transition between Red and Blue.
Mix:
- Violet
- Red
- a touch of White
Place a few small strokes in intermediate areas.
Keep them subtle.
STEP 108 — CHECK THE BODY FOR FLAT AREAS
Step back.
Look for places that feel too uniform.
If an area is too flat, add:
- one darker shadow,
- one mid-tone stroke,
- and one lighter accent.
That is often enough to restore dimensionality.
STEP 109 — ADD DARK FEATHER GAPS
Use a small brush.
Mix:
- Black
- Vandyke Brown
- a little Blue
Add a few narrow dark gaps between feather groups.
Do not outline every feather.
The dark marks should simply suggest separation.
STEP 110 — ADD FINAL LONG FEATHER STROKES
Use a larger Filbert.
Load with a bright mixture.
Pull several long expressive strokes downward.
Let them overlap.
Use:
- Yellow
- Orange
- Red
- Green
These longer strokes help unify the body.
STEP 111 — DRY-BRUSH SELECTED HIGHLIGHTS
Use a nearly dry brush.
Load with a light Yellow-White mixture.
Wipe off most of the paint.
Then drag the brush gently over selected feathers.
The broken texture should catch the canvas.
This gives the plumage a natural, textured appearance.
STEP 112 — USE YOUR FINGERS FOR FINAL SOFTENING
Now use your fingers carefully.
You may soften:
- a harsh feather transition,
- the edge of a highlight,
- a body shadow,
- or a section where warm and cool colors meet.
Use light pressure.
One pass is usually enough.
Do not overwork the area.
STEP 113 — RESTORE TEXTURE AFTER FINGER BLENDING
If finger blending makes an area too smooth, return with the brush.
Add a few fresh strokes.
This is a useful rhythm:
blend,
restore,
blend,
restore.
The result is a balance between softness and texture.
STEP 114 — SOFTEN SELECTED BODY EDGES
Use a dry brush or finger.
Allow parts of the lower body to disappear into the background.
This helps the face remain dominant.
Not every feather needs a hard silhouette.
STEP 115 — PAINT THE BACKGROUND INTO THE BIRD
One of the best ways to refine the silhouette is to use background color.
Mix a color close to the surrounding background.
Paint carefully into selected edges of the bird.
This can:
- reduce awkward protrusions,
- soften transitions,
- create lost edges,
- and shape the silhouette.
STEP 116 — REINTRODUCE BACKGROUND COLOR VARIATION
The background should not feel completely flat.
Use a large soft brush.
Add subtle touches of:
- Lavender
- Violet
- Soft Blue
- Beige
- Gray
- muted Orange
Keep them soft.
Do not create distinct objects.
The background should remain abstract.
STEP 117 — CREATE A SOFT HALO AROUND THE HEAD
You can subtly lighten the background near the parrot’s head.
Use a soft mixture of:
- White
- Lavender
- Beige
Blend gently.
Do not create a perfect glowing circle.
The light should feel atmospheric.
This increases separation between the bird and the background.
STEP 118 — DARKEN SELECTED BACKGROUND AREAS
To strengthen contrast, darken small areas farther from the focal point.
Use:
- Violet
- Brown
- Blue
- a tiny amount of Black
Keep these passages soft.
This helps frame the bird.
STEP 119 — ECHO THE BIRD’S COLORS INTO THE BACKGROUND
Add faint traces of the bird’s colors around the canvas.
For example:
- a little Orange,
- a little Green,
- a touch of Blue,
- a touch of Red.
Blend them softly.
These echoes unify the painting.
STEP 120 — CHECK THE OVERALL COLOR BALANCE
At this point, the painting should contain a strong range of:
- Yellow
- Green
- Orange
- Red
- Blue
- Violet
- Black
- White
But no single color should overwhelm everything.
If one color dominates, introduce a small amount of its complement elsewhere.
STEP 121 — CHECK THE VALUE STRUCTURE
Squint at the painting.
You should see:
a strong dark focal area around the eye,
a dark blue beak,
bright yellow-green feathers,
warm mid-tones through the body,
and softer background values.
If everything appears similar in value, increase either darks or lights.
STEP 122 — ADD THE BRIGHTEST FINAL HIGHLIGHTS
Now use your brightest paint.
Mix:
- White
- Yellow
Add a few selected marks.
Good places include:
- feather tips around the eye,
- upper facial feathers,
- one or two body feathers,
- and a small beak reflection.
These should be rare.
STEP 123 — ADD TINY WHITE ACCENTS
Use a detail brush.
Add tiny white touches.
These can suggest light catching individual feather edges.
Use very few.
Tiny accents are more effective than many.
STEP 124 — ADD FINAL DARK ACCENTS
Mix Black with Vandyke Brown.
Place a few dark accents near:
- the eye,
- underneath feather groups,
- between body layers,
- and beneath the beak.
This restores contrast after all the highlighting.
STEP 125 — CONSIDER A FEW SPONTANEOUS MARKS
If the painting feels too controlled, introduce a few spontaneous marks.
These might be:
- quick brush flicks,
- dry-brush scratches,
- small color streaks,
- or broken edges.
Keep them subtle.
They should support the expressive feeling.
STEP 126 — DO NOT FORCE SPLATTER
Paint splatter can work in some expressive paintings, but it is not always necessary.
For this parrot, the feather color already creates substantial visual energy.
Only add splatter if it genuinely improves the painting.
If you do use it, keep it minimal.
STEP 127 — CHECK THE FEATHER FLOW
Look at the painting again.
The feather movement should flow:
away from the eye,
around the cheek,
forward near the beak,
upward around the crest,
and downward through the body.
If one area breaks this rhythm awkwardly, adjust it.
STEP 128 — CHECK THE COMPOSITIONAL WEIGHT
Because the parrot fills most of the canvas, make sure the bird does not feel visually trapped.
Allow some background to remain visible.
Negative space gives the subject room to breathe.
STEP 129 — RESIST ADDING MORE DETAIL
This is where many paintings become overworked.
If the painting already communicates:
color,
energy,
expression,
and character,
you do not need to keep adding.
More detail does not always create a better painting.
STEP 130 — SIGN THE PAINTING
Once you are satisfied, allow the surface to dry enough for signing.
Use a detail brush.
Choose a color that is visible but not distracting.
Place your signature near the lower edge.
Keep it small.
FINAL REVIEW
Before calling the painting finished, check these areas one last time:
Eye
Does it feel alive?
Beak
Does it feel rounded and dimensional?
Face
Is the yellow-green color strong enough?
Body
Does it contain layered warm and cool feather colors?
Edges
Are some sharp and others soft?
Background
Does it support rather than compete?
Highlights
Are they concentrated instead of everywhere?
Overall feeling
Does the painting still feel expressive?
If the answer is yes, stop.
FINAL LESSON
The most important lesson in this painting is that a colorful subject does not require every color to be carefully controlled.
The parrot works because of the interaction between:
bold color, visible brushwork, dark contrast, loose feather shapes, selective blending, and concentrated detail.
The eye gives the bird personality.
The beak gives it structure.
The feathers give it movement.
And the loose brushwork gives the painting life.
Acrylic painting becomes much more exciting when you stop trying to describe every tiny detail and instead allow color, direction, texture, and rhythm to communicate the subject.
That is what gives this painting its expressive character.



Leave a Reply
You must be logged in to post a comment.