

Creating captivating backgrounds in acrylic landscape painting is essential for setting the scene and evoking emotion. One of the most effective techniques for achieving these enchanting effects is the dabbing technique. By utilizing a variety of brushes and unconventional tools, artists can create rich textures and dynamic layers that breathe life into their work. In this post, we will explore the art of dabbing, including the tools necessary for the technique, step-by-step implementation, and the creative ways you can use this method to enhance your backgrounds.
1. Understanding the Dabbing Technique
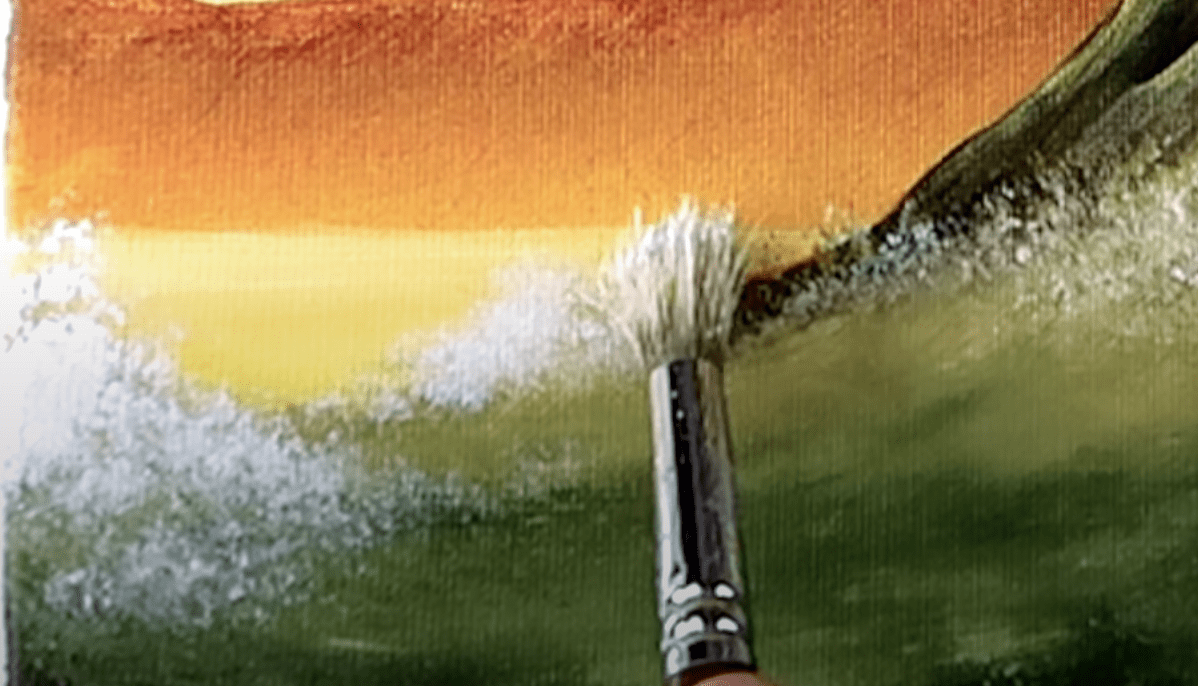
A. What Is Dabbing?
Dabbing is a painting technique that involves using a brush or tool to apply paint in a gentle, percussive manner. Instead of sweeping paint across the canvas, artists use a controlled tapping or stippling motion to achieve a textured effect. This method is particularly effective for creating natural elements like foliage, clouds, and other organic forms.
B. Why Use Dabbing for Backgrounds?
- Texture Creation: Dabbing allows you to build layers of texture easily, creating a rich, tactile surface that draws the viewer’s eye and adds depth.
- Soft Edges: The technique provides softer edges and transitions, ideal for depicting elements that blend into the background, such as misty mountains or smooth skies.
- Versatility: Dabbing can be adapted to achieve various effects, from delicate touches in floral scenes to bold splashes in abstract compositions.
2. Tools You’ll Need for Dabbing
Using the right tools is essential for mastering the dabbing technique. Here’s a list of brushes and unconventional items that can help you achieve stunning results:
A. Brushes
- Fan Brush
- Description: The fan-shaped bristles allow for a wide surface area, perfect for creating textures that mimic foliage or clouds.
- Best Use: Ideal for applying quick textures in tree canopies or cloud forms, giving a natural feel to the background.
- Stippling Brush
- Description: A short-bristled round or flat brush used for creating dot-like effects.
- Best Use: Useful for creating dense textures, such as grasslands or rocky surfaces. Stippling brushes are excellent for a detailed background.
- Round Brush
- Description: The classic round brush with tapered bristles can handle details and broader shapes simultaneously.
- Best Use: Great for soft dabbing effects like flowers, distant mountains, or blending color transitions in skies.
B. Unconventional Tools
- Makeup Sponge
- Description: A soft, porous sponge used for applying and blending various textures.
- Best Use: Perfect for achieving soft sky gradients or cloud textures, allowing for gentle, feathery backgrounds.
- Kitchen Sponge
- Description: A firm sponge that can be cut into different shapes.
- Best Use: Effective for painting large areas or applying texture over broad backgrounds.
- Palette Knife
- Description: A tool with a flexible blade used to manipulate paint.
- Best Use: While not a typical dabbing technique, palette knives can create interesting texture with thick paint, suitable for impasto-style backgrounds.
3. Mastering the Dabbing Technique
A. Preparing Your Workspace
- Gather Supplies: Collect your brushes, paints, palette, paper towels, and any unconventional tools you’ll use for dabbing.
- Set Up Your Palette: Squeeze out your colors on the palette. Consider having lighter and darker shades of the same color for depth and dimension.
B. Step-by-Step Process of Dabbing
- Start with a Base Layer:
- Begin by painting your canvas with a base layer. This can be a solid color that serves as the foundation for your background (e.g., a light blue for the sky).
- Select Your Tool:
- Choose a brush or tool suited for dabbing. A fan brush is an excellent choice for this demonstration.
- Load Your Brush:
- Dip your brush into the paint, ensuring it’s loaded but not overloaded. Wipe off any excess paint on a paper towel to avoid drips.
- Dab with Control:
- Use a gentle dabbing motion to apply paint to the canvas. Start at the top (for a sky) or background areas and work your way forward. For clouds or foliage, make various patterns to build texture.
- Layering Colors:
- After applying the first layer, experiment with other colors. While the first layer is still wet, dab a contrasting or complementary color to create depth and interest.
- Experiment with Texture:
- Use different tools and brushes to experiment with texture. For instance, switch to a makeup sponge or a stippling brush as you continue to dab and layer colors.
C. Creating Depth with Dabbing
- Use Light and Dark Shades:
- Apply a darker shade to the edges or lower areas of your background to give the illusion of depth. This technique creates a gradient that mimics shadows and adds realism.
- Vary Pressure:
- Adjust the pressure used when dabbing to achieve different effects—lighter pressure will create softer, delicate forms, while firm pressure yields bolder dabs.
- Combine Techniques:
- Don’t hesitate to mix dabbing with other techniques. For instance, paint a layer of wet-on-wet blending for the sky and finish with dabbing over it for clouds or texture.
4. Incorporating Dabbing into Landscape Painting
A. Background Skies
- Use a combination of dabbing and blending techniques to create a vibrant sky. Start with a blue base for the sky and dab lighter colors on top to represent clouds or sunlight.
B. Forests and Foliage
- For dense trees or foliage, dab various shades of green to build layers, starting with darker greens at the base and lightening as you move upwards to create depth.
C. Ground and Terrain Textures
- Use a kitchen sponge or a stippling brush on the ground to simulate grass or rocky surfaces. Experiment with browns, greens, and yellows for a rich visual experience.
D. Water Reflections
- When painting water, dab colors that reflect the sky and surrounding scenery. Lightly blend dabs using a clean brush or sponge to create the illusion of ripples.
5. Tips for Successful Dabbing
A. Practice Dabbing on Scrap Paper
- Try different tools and techniques on scrap paper or canvas before applying them to your artwork. This will build confidence and allow you to discover your preferred methods.
B. Keep Brushes Clean
- Frequently clean your brushes and tools between colors to avoid muddy results. This practice ensures that each color remains vibrant and distinct.
C. Observe Nature
- Spend time observing real landscapes and how light and texture interact. Take photos for reference and practice recreating the effects you see.
D. Stay Flexible
- Dabbing is a versatile technique that encourages experimentation. If it doesn’t go as planned, embrace the unexpected and adapt your painting accordingly.
6. Conclusion: Enhancing Your Landscapes with Dabbing
Dabbing is an essential technique in acrylic painting that allows for the creation of captivating backgrounds and textures. With the right brushes and tools, this method can bring depth, light, and life to your landscapes, enhancing your artistic expression.
At Urart Studio, we are dedicated to providing artists with the resources they need to elevate their craft. Explore our unique selection of brushes, paints, and supplies at urartstudio.com/shop. For further artistic guidance, be sure to check out our valuable painting tips at urartstudio.com/painting-tips and our step-by-step painting instructions at urartstudio.com/step-by-step-painting-instructions. Let’s embark on this artistic journey and make your landscapes shine with vibrant backgrounds!
Keywords: dabbing technique, acrylic landscape painting, brush techniques, captivating backgrounds, texture creation, art supplies.
#DabbingTechnique, #AcrylicLandscapePainting, #BrushTechniques, #CaptivatingBackgrounds, #TextureCreation, #ArtSupplies
Leave a Reply
You must be logged in to post a comment.