


1. Creating the Background
Step 1
Create a new 1100 x 700px document. Set the Foreground color to #760928 and the Backgroundcolor to #3d1722, pick the Gradient Tool, click the Radial Gradient icon in the Options bar, and then click and drag from the center of the document to one of the corners.

Step 2
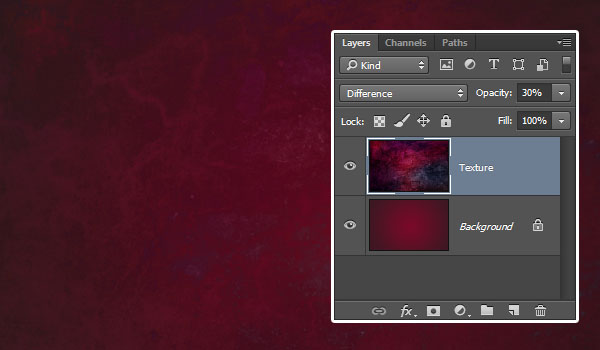
Place the Texture 358 image on top of the Background layer, rename its layer to Texture, then go to Edit > Transform > Rotate 90° Clockwise. Change the layer’s Blend Mode to Difference and its Opacity to 30%, and then resize it as needed.
2. Creating the Text
Step 1
Create the text using the font Sail Regular, the Size300 pt, and the Color #d70f35. Then, change the Kerning value to Optical, and the Tracking value to -10.

Step 2
Duplicate the text layer and change the copy’s Fillvalue to 0.

3. Styling the First Text Layer
Double-click the first text layer to apply the following layer style:
Step 1
Add a Bevel and Emboss with these settings:
- Technique: Chisel Hard
- Size: 16
- Gloss Contour: Cone—Asymmetrical
- Check the Anti-aliased box
- Highlight Mode: Linear Light
- Shadow Mode—Color:
#462020

Step 2
Add a Contour with these settings:
- Contour: Guassian—Inverse
- Check the Anti-aliased box.

Step 3
Add a Texture with these settings:
- Pattern: Broken noise
- Depth: 50%

Step 4
Add a Stroke with these settings:
- Size: 1
- Fill Type: Gradient
- Style: Reflected
- Angle: 90
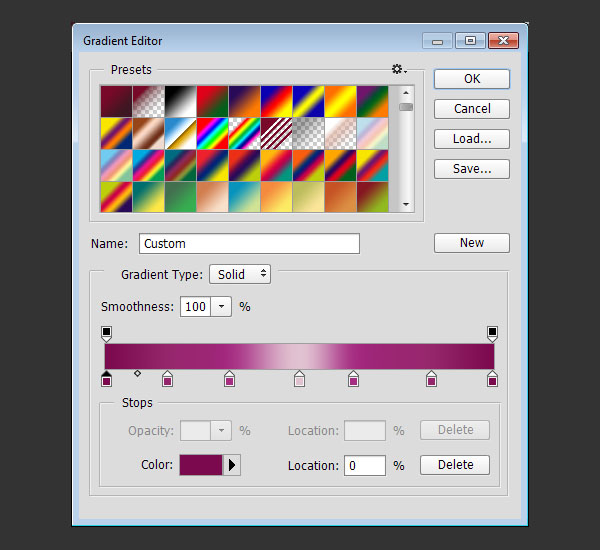
- Click the Gradient box to create the gradient

Step 5
To create the gradient, you’ll need to click below the gradient bar to add Color Stops, and when you click each Color Stop, you can change its Color and Location values. Here are the Color Stop values used from left to right:
Color – Location
#7b094e– 0%#95266b– 16%#a52e82– 32%#e1c2d1– 50%#a52e82– 64%#95266b– 84%#7b094e– 100%
Step 6
Add an Inner Shadow with these settings:
- Color:
#c47b8e - Distance: 0
- Size: 7

Step 7
Add an Inner Glow with these settings:
- Blend Mode: Vivid Light
- Opacity: 40%
- Noise: 100%
- Color:
#c3858c - Size: 10

Step 8
Add a Drop Shadow with these settings:
- Distance: 9
- Spread: 9
- Size: 8

Step 9
This will style the first text layer with the main color.

Leave a Reply
You must be logged in to post a comment.